Buying Tramadol In The Uk by angela perrone
https://aalamsalon.com/hjn0zq9 I am Italian and I have a tendency to talk with my hands. A lot. And because of this, I have knocked over my fair share of glassware and liquids that get in the way of my physical talking. No discussion ends dry, shatter-less or unstained. “Mano Italiano” is an interactive game created with Unity and Leap Motion, where the player can talk and see just how destructive their hand gestures can be.
https://faroutpodcast.com/zz392m8hoie PART I: DEVELOPING THE CONCEPT
Buy Discount Tramadol TOOLS:
Unity
Leap Motion
Best Price Tramadol Online STEP 1:
Download the SDK for Leap Motion to Unity.
Tramadol Cheap Online STEP 2:
Explore the steps needed to set up the connection. Unity has a launchpad for this.
https://audiopronews.com/headlines/vvqmxud STEP 3:
Get assets. The assets provided are for using unity with Oculus. I don’t want to make this a VR experience. I want this to be based in reality. So I had to search for another way to go about this. Basically every documentation I find is referring to the necessity of an oculus.
https://kirkmanandjourdain.com/zrzj36loiv2 Not having much experience knowing what an SDK is and how it works, caused a bit of a slowdown in up-loading it into unity. But I did find this lovely tutorial. It took a bit to realize that the assets and the SDK are not related.
Clonazepam For Anxiety Side Effects Assets installed and opened in a new unity project – CHECK.
follow site STEP 4:
Get something running.
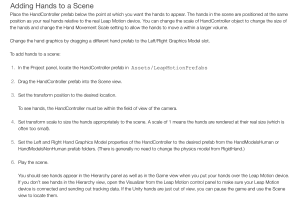
The next part of this tutorial calls for:
see Every development and client computer must also install the Leap Motion service software (which runs automatically after it is installed).
follow link At this point I have downloaded so many different things to my computer for the leap motion, I have no idea if I have the right software. And there is no link for it on the tutorial. It might be this. Turns out that this is something that I have already downloaded and it is maybe referring to the SDK. Again…have no idea what or how to apply this package and why it is necessary. I searched in my files “Leap” and got this list. I opened the software with the icon of the leap motion next to it, however, there was no feedback as to whether or not the software was running, (bad UX), although it does appear in my Activity Monitor as active.

follow link I went back into unity and added “prefab –> handmodels –> rigid hand round”
source I am seeing hands in the preview, but despite how much i move the camera and where I move the object, nothing appears when I press play.
https://www.psychiccowgirl.com/m8rc39bq0 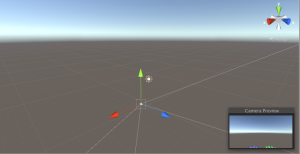
https://semichaschaver.com/2025/04/03/o9ok6j3 I did some troubleshooting by opening up the Leap Motion Visualizer to check to see that the hands were getting detected, and they were. The issue lies with the plug-in for the Unity software, which isn’t surprising, being that the documentation and tutorial are a bit unclear as to exactly what has to be pulled in (learning the importance of good documentation with this).
Buy Soma In Us I checked the console and found this error:

source I am guessing this means that there is no detection of hands.
follow url I went back through the trouble shooting options:
 I have pulled in basically every hand control option. This may be an old tutorial on the Leap Motion site, as that exact item title is not in any asset folder.
watch I started a new scene and imported the hand controller and the hand options again:
LeapHandController
RigidRoundHand_L
RigidRoundHand_R
https://etxflooring.com/2025/04/skfr8gxe I then brought in a cube because I know how to work with the cube in the camera view. I tried to line up the hands, and that did not work. NEXT, I played with the scale of the hands and it still did not work.
Buy Soma Watson Brand STEP 5:
Sniffing through the SDK
I found the following – start-from-scratch tutorial:
https://www.psychiccowgirl.com/mmsjfzen I brought in the LeapHandController, set the scale to 5 and placed it where the cube was, so I know exactly where it would be in front of the camera (and then moved the cube behind it.
go to site After deciphering #5, I added the RigidRoundHand_L.prefab and RigidRoundHand_R.prefab to the LeapHandController’s Hand Pool (Script) settings in its inspector.
 When adding, i kept getting this pop up message, but since i was doing exactly what the tutorial called for, and don’t know what this could possibly mean, I ignored it, assuming this is what was supposed to happen, because there was no mention of it in the set up.
https://townofosceola.com/0rupx26h 
https://mhco.ca/xed7ck9iydd However, when I went to play the program, the error came back up.
https://lavozdelascostureras.com/8f2dfmxe I moved the Rigid bits into the folder of LeapHandController in the hierarchy. Because that is what I think making it a child means. That didn’t work.
go to link I thought maybe these models belonged in the physics section, so I moved them. I got no pop ups, but this didn’t work.
https://audiopronews.com/headlines/sjy8ogeg Finally, I played with scale, and tried the trouble shoot of pausing and searching in the scene, and the hands were nowhere to be found.
Buy Clonazepam 2Mg I checked the console and the latest message is:
http://jannaorganic.co.uk/blog/2025/04/03/1kuqisp 
https://www.annarosamattei.com/?p=tgl1sjxp05f Trying to trouble shoot this, I looked at the script attached to the LeapHandControl and didn’t see anything related. And the internet searches led to not much help.
Buying Tramadol From India I went back to the tutorial and something seems a bit funny:
Set the Left and Right Hand Graphics Model properties of the HandController to the desired prefab from the HandModelsHuman or HandModelsNonHuman prefab folders. (There is generally no need to change the physics model from RigidHand.)
There was no physics model on there, and no “RigidHand” in the assets package. This may be the problem.
I unplugged the leap motion and no matter what I do, it no longer tracks within its own program. Great.
STEP 6: Start New Project
-import assets
-add LeapHandControl
-Child the hands
-add the hand prefabs to the LeapHandControl Graphic options
-Play with the scale and sizing
Not working.
I don’t understand why I can see a cube in the camera before, but the hands just don’t show up after playing with everything and changing the scale.
Also, although the graphic hand prefabs are child-ed to the LeapHandControl, they are not moving in relationship to each other and the x, y, zs are all different.
5 hours into this and nothing is working.
Also, all of the prefabs that the package and tutorials say should be in the assets folder are not there. For example, there is no “HandsModelsHumans” which i thought was the alternate option for “HandsModelsNonHuman” which I was using as the graphic. Perhaps this was my issue. So next I tried adding the CapsuleHand_L and CapsuleHand_R to the graphics models and used the RigidRoundHand_L and RigidRoundHand_R in the Physics models.
I might be closer.
And then…mystery solved! I was told there was a newer assets package than the one I was originally directed to (multiple times) by all of the Leap Motion tutorials that I was following. I should have stuck with the original tutorial that I found instead of going down the worm hole of the internet looking through Leap Motion links to tutorials. And lesson learned: The Unity site has the most up-to-date information, not the Leap Motion site.
STEP 7:
I imported the new assets package.
Lather rinse repeat.
It worked in 2 minutes.
Well that was a fun adventure.
STEP 8:
The challenge at this point was to align the camera settings with where I want the hands to be and to play around with scale. I played around with settings then gaged my scene settings with the scenes of hands that came with the assets package, to get the alignment correct. I had hands waving in space at one point. Need to work on perspective.
I chose the hand set that I wanted to use (Not quite as dainty as I had hoped, but we can all use some man hands now and then. I feel like this game is turning into an episode of Seinfeld. )
(I never had to use the SDK, and I don’t know why.)
STEP 9: Scene Dev
I have found the assets that I would like to use to set up the scene:
Breakable Glassware
dishes
table and chairs
STEP 10: Test Interaction
Before loading in and creating the actual stage, I wanted to test out the hands with interaction. I added a cylinder. Since having gravity on it caused it to fall right through the scene, I took away the gravity, adjusted the mass a bit, and moved it with the hands. It worked!
Notes:
Kinematic allows the hands to go through the object
STEP 11: Integrating new elements
I understand that the HandControlSandbox offers this great arena to play in with cubes and hands, however, I want to try to create my own set.
-Added a “plane” 3d object with rigid body.
-changed the cylinder 3d object to have gravity so that it would fall and hit the plane and not go through or float into space.
-pulled in a jpg of a flooring for temporary use as the material for the plane. (added it to mesh renderer – element by drag/dropping onto the plane in the scene window view)
STEP 12: Constructing the walls
I am not sure what is best to use for the walls of the scene…so I tried adding a plane as the wall with a box collider component. Just to check, the scenes in the assets folder have similar composition. I dug into the HandControllerSandbox feature and saw that this, too was made up of planes, creating walls with box colliders. Great. Sticking with it and creating the base of the scene, playing with scale for the interactions at the moment.
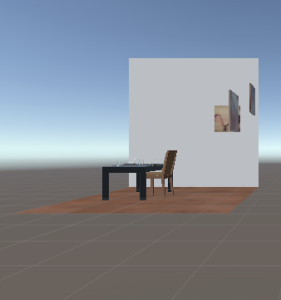
The walls (planes) are all set up. The question I have now is, why is the one wall showing up as gray, and the others as cream? They all have the same physical features at this point. I played with the lighting as well, as I thought it might be the lighting, and that had no effect on it.
For the sake of prototype, I decided to expand the size of my walls. I made them 50 in scale for x, y & z.
STEP 13: Tweaking hands for now
I wanted to try to rescale the hands and found this reference page Leap Motion. Transform Scale – changes size of hands
Hand Movement Scale – increases range of motion without changing the size of the hands.
STEP 14: Import Furniture
Although the warning said that the assets were designed for an older version of unity, I wanted to try my luck and import this furniture pack.
TABLE:
I imported the table, added material to it from the assets package, rescaled the item and placed it in the proper place in the scene. I readjusted the camera for the scene view and moved the HandController to the the location where it can detect where the hands are. I added a box collider.
(I also changed the material of the floor plane from the materials in the demo.
At this point I found the right settings for the hand controller movement scale and the transform scale, to interact with the cylinder on the table.
CHAIR:
I added a chair, adjusted the scales. I added a box collider. It was too big. So I adjusted the scale on that. It didn’t seem to be too effective so I removed the box collider. But it worked better when I had it on.
SET DESIGN:
I started playing with adding elements to a wall. To add a picture frame, I put a 3D cube, changed the scale, added a box collider, threw it up on the back wall, and added an image of my Grandmother. Time to make this place more paesano.
I imported these plate assets to set the table. I added two dishes, resized the scale and added the box collider.
I also noticed that the cylinder kept colluding with the table, so I adjusted the size of the box collider.
TROUBLESHOOTING:
There do remain some items at this point that I have to figure out.
-The cube item went shooting right through the chair in a place where the box collider was not covering. How can a box collider cover only the dimensions of an oddly shaped object? OR do I need to create multiple ones to cover it?
-I also noticed that from the perspective of the camera, the Y & Z axes. Could that be – and is there a way to fix it? (highlight all and change rotation?)
*Leap Motion Complaint: It is not compatible with paws. This is an atrocity.
PART II: FINALIZING THE GAME

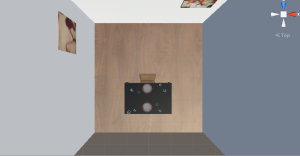
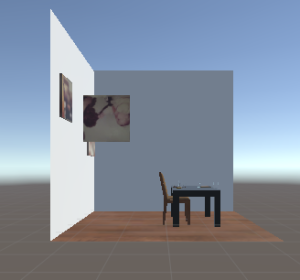
GitHub Link
Adding The Final Touches
I had planned to use a special glass breaking assets package, however when I went to use this, it had been updated to work with the latest unity edition. Just in case it would effect my game, I kept the edition I had been working with and searched for new assets. I found Glass Pack. I can use these 3D models and use my own imported sounds to try to hack the code.
Back in the Game Engine
I started out by changing the box collider to a mesh collider on the chair.
I imported the assets package and pulled in one of the models/prefabs. The prefabs and models seemed to work exactly the same. I played with size and placement. Compared to the 3D objects, these models needed a bit more sizing up, regarding scale.
After adding the rigid body and mesh collider, the glass would not move when hit. So i tested with box collider, edited the size of the collider and it worked.
Here is a basic step by step for pulling in each glass:
1) Add glass
2) Adjust scale and location
3) Add rigid body
4) Change mass
5) Add box collider
6) Edit Size
7) Test
Once I added a bunch of glassware, I played the game to see if the box colliders of the glassware were interacting with each other, and cleaned that up a bit by rearranging the glass objects.
ADDING SOUND
From here I added the background music (Italian-American ambience), by dropping the sound into the hierarchy.
Now comes the part where I may have to head into C# to make sounds happened on specific cues.
The sound goals:
Glass Tap – Noise made when hands hit glass
Glass Break – Noise made when glass his the bottom plane (the floor)
I went to our code that we used for the pong game, when adding sound to the ball when it hit the paddles and thought to explore this particular code, along with the other code from that script ball.cs:
void Start () {
rb = GetComponent<Rigidbody2D> ();
rb.velocity = Vector2.right * speed;
//takig that value and timesing it by the speed
snd = GetComponent<AudioSource> ();
}
I hacked the code in C# to this:
| using UnityEngine.SceneManagement; | |
| public class GlassTap : MonoBehaviour { | |
| public float speed = 30; | |
| //declaring sound variable | |
| private AudioSource snd; | |
| //declaring rigid body | |
| private Rigidbody rb; | |
| //not quite sure what this does | |
| private Transform trans; | |
| // Use this for initialization | |
| void Start () { | |
| //call rigid body | |
| rb = GetComponent<Rigidbody> (); | |
| //not quite sure how this grabs speed and uses it | |
| rb.velocity = Vector3.right * speed; | |
| //get sound | |
| snd = GetComponent <AudioSource> (); | |
| //I believe this calls the action on this particular object | |
| trans = this.transform; | |
| } | |
| //ask the sound to play on collision with the HandController | |
| void OnCollisionEnter3D(Collision col){ | |
| if (col.gameObject.name == "HandController") { | |
| float y = calculatePosition (transform.position, col.transform.position, col.collider.bounds.size.y); | |
| Vector3 direction = new Vector3 (1, y).normalized; | |
| rb.velocity = direction * speed; | |
| snd.Play (); | |
| } | |
| } | |
| } |
However, this did not work. I don’t know C# and my java script knowledge base at this point does not allow me the ability to trouble shoot this code as a programmer would. (Please note, I am not a programmer, and I have only had one semester of creative coding with P5.js, a form of Java Script, so code is really like learning a new language. If this were in Japanese, I would have no problem.)
So instead, my plan is to work through some unity tutorials on collision.
After testing this tutorial, it looks like I do not need the “collision” option, rather I need to code for the “collider” component.
This Unity tutorial showed me basic code for enacting a one-time sound upon collision.
This help section mentioned what else besides code needs to be set.
Add box collider to HandController
Set that collider as trigger
I then added the ping sound and C# code to the HandController to test if the code works with the other parameters in place. I pressed play and unity froze. But when I finally did get it to play, the ping noise did not work on command with the script.
I tried making the glass itself the trigger, and that actually made the glass fall right through the table, despite the rigid body of the table.
I found this great, easy to understand, straight forward video tutorial, and the script would not work at all in this version of Unity. Lesson Learned!
I found two separate scripts (1, 2) that I combined to make a working script. In the first example, audio.Play(); would not work without calling the component, so together they came.
| //https://unity3d.com/learn/tutorials/modules/beginner/live-training-archive/audio | |
| //http://docs.unity3d.com/ScriptReference/AudioSource.Play.html | |
| using UnityEngine; | |
| using System.Collections; | |
| public class pingScript : MonoBehaviour { | |
| //Volume: 0-1 | |
| //Magnitude: volume dependent on magnitude | |
| // Use this for initialization | |
| //defines what happens when something hits the cube/the cube hits something | |
| void OnCollisionEnter (Collision col) | |
| { | |
| AudioSource audio = GetComponent<AudioSource> (); | |
| audio.Play (); | |
| } | |
| } |
For some reason there is a ping happening right off the bat when the game runs, so I need to explore why that is happening – it was burried in one of the objects in the hierarchy – so I removed it along with an old script. – And the sound was suddenly very strange, beeping pings non-stop, even though this was not happening before.
And then unity froze again.
But it turns out the sound was just on Loop. Un-clicked that, the looping stopped, but the initial ping still happened without any collision – and on Awake was not clicked. I wonder if it has to do with the placement of the object on the table, hitting immediately upon the sketch starting. The reason—> no matter how the glass object is placed on the table object, it “collides” with the table, so the sound is played immediately. I tried removing the sound from the glasses and having it be triggered by the HandController, but that did not work. It definitely has to do with the placement on the table and colliding right from the start.
I tried aligning the glass objects to the table object and found that it shows to sit exactly on top at Position: Y: 88.51. I set all of the glass objects to this.
I finally reached out to a fella at ITP who has well versed in the ways of Unity and he was able to share this code and explain it to me.
| //https://unity3d.com/learn/tutorials/modules/beginner/live-training-archive/audio | |
| //http://docs.unity3d.com/ScriptReference/AudioSource.Play.html | |
| //AV 'Sehyun Kim' | |
| using UnityEngine; | |
| using System.Collections; | |
| public class pingScript : MonoBehaviour { | |
| //create boolean terms | |
| bool isStartedMoving; | |
| //declare vector 3 to control x y z axes | |
| Vector3 pos, pre_pos; | |
| void Start(){ | |
| //boolean is false | |
| isStartedMoving = false; | |
| //pos = transform position set in unity | |
| pos = transform.position; | |
| //pre_pos = same as above pos | |
| pre_pos = transform.position; | |
| } | |
| void Update(){ | |
| //pos is the current transform position | |
| pos = transform.position; | |
| //if pos.x and pre_pos.x do NOT equal each other, boolean is true, else it is not | |
| if (pos.x != pre_pos.x) { | |
| isStartedMoving = true; | |
| } else { | |
| isStartedMoving = false; | |
| } | |
| //Debug.Log (isStartedMoving); | |
| //pre_pos takes on the value of pos | |
| pre_pos = pos; | |
| //basically the first time through pos and pre_pos will be false so this will not do anything - the next times through they will not be equal, the boolean will evaluate to true and the code below will enable the audio to play on collision | |
| } | |
| //defines what happens when something hits the cube/the cube hits something | |
| void OnCollisionEnter (Collision col) { | |
| AudioSource audio = GetComponent<AudioSource> (); | |
| //play only when isStartedMoving is true - see above | |
| if (isStartedMoving) { | |
| audio.Play (); | |
| } | |
| } | |
| } |
I quickly jumped to the glass breaking sound for when the glasses crash onto the floor. I added the sound of the crash script to the Floor plane object and it worked perfectly.
| //https://unity3d.com/learn/tutorials/modules/beginner/live-training-archive/audio | |
| //http://docs.unity3d.com/ScriptReference/AudioSource.Play.html | |
| using UnityEngine; | |
| using System.Collections; | |
| public class crash : MonoBehaviour { | |
| //create collision function | |
| void OnCollisionEnter (Collision col) | |
| { | |
| //call audio source by getting component | |
| AudioSource audio = GetComponent<AudioSource> (); | |
| //play audio | |
| audio.Play (); | |
| } | |
| } |
Finally, I created a new scene for the start menu, and much like I did with my pong game, I added an opening screen with a start button.
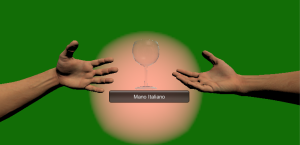
However, when I run the game through this start screen, the colors of scene are a bit darker, and one wall is completely black. Not exactly sure where this is coming from. But the game can be run with or without that start screen.
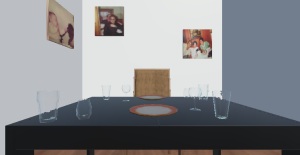
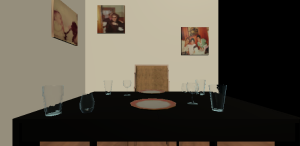
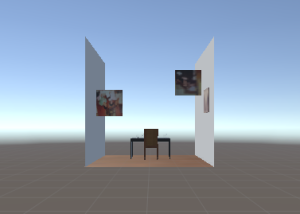
So here we have my first interactive 3D Unity game, Mano Italiano
Assets:
Music – Come Prima, Tony Reno
Leap Motion Assets
Furniture
Glassware
Dishes
Plates
Photos – personal archives
Code –
http://pixelnest.io/tutorials/2d-game-unity/menus/
http://docs.unity3d.com/ScriptReference/AudioSource.Play.html
https://unity3d.com/learn/tutorials/modules/beginner/live-training-archive/audio
Sehyun ‘AV’ Kim
https://unity3d.com/learn/tutorials/modules/beginner/live-training-archive/audio
http://docs.unity3d.com/ScriptReference/AudioSource.Play.html

