
Design Challenge: Create a sound controller that can perform 6 functions: play/stop, pause/play, skip ahead, skip back, fast forward, random song that can be used by someone visually impaired.
Sound Controller – Tangible Interaction Workshop from Angela at ITP on Vimeo.
The Sound Controller
This sound controller was designed both tactically and haptically for the visually impaired. It features a haptic motor controller and a vibration motor for haptic feedback, with specific vibrations for each sound control feature that match the actions best. It is hand-held in size so the user can grasp the controller, press the buttons and feel the haptic response to their commands. Under the hood the buttons are basic pushbuttons for all functions except play/stop and pause/play. Those two buttons are momentary push buttons with one state being for play and the other for the second function. The tops of the buttons are made with game controller thumb caps, soft and rubbery in texture. Shapes resembling the classic play, pause, shuffle, etc icons are carved out on top for touch recognition.


The process
Step 1: Setting Up the Microcontroller
The first step was to set up the microcontroller (Feather M0 Adalogger), DRV motor board and the vibration motor.
Step 2: Test Out Arduino Examples
I added the DRV motor library to Arduino (in both libraries and library manager) and began to test out the sample code to get a feel for the new motor. I worked with the complex and other examples, trying to learn how the code works.
Step 3: Jump Into p5 examples
Putting the Arduino and circuit aside for a moment, I hopped over to the music player code in p5 provided by Tom Igoe.
I had a lot of trouble with getting my songs in the music folder not being recognized even when the name was input correctly. Eventually I simplified the names of the songs and redid the code multiple times. I had the same issues with the same exact code even when copied directly from the sample code. One issue I experienced (multiple times) was the code trying to pull song names that were not in the code nor in the folder. Eventually after several re-downloads later and simplified song names, the music player worked with its original keyboard press programming.
Another issue I had to trouble shoot with the code was the rewind feature getting stuck on rewind, even after being stopped and play being pressed again. This was fixed by adding a song.rate(1.0) line of code in the play/stop and pause/play buttons, so if pressed they would return to the original song rate. I did try with many variations of switch states and testing to have the rewind button return to the original speed if pressed again, but I did not have any success in getting this to work.
Step 4: Back to Arduino: Adding a Button
I added one button to the circuit to test out its function with the motor and the code. This took work to figure out the switch state and how to get the motor code to work when the button was pressed. But eventually I got it working.
This is a modal window.
Step 5: Serial Communication
Serial communication was a huge challenge as it changed since last I worked with it, but after going through this tutorial step by step, some trial and error, the connection was made between the Arduino and p5.
Quick Unpacking of Serial Tutorial:
- Add the serial communication code from the tutorial to the existing p5 code
- Run the p5 serial app (make sure arduino serial monitor is closed)
- Run the p5 code in a local server and then open that in an incognito window (optimal for running the code that you will most likely be updating over the course of your work)
- Plug in the arduino to the computer, reload the p5 music player and you should have serial communication up and running – however, your codes have to be matched for this to work the way you intend it to
Step 6: Sending out the Right serial.Write to Control Songs
The p5 code is not written to pull in serial data. So I had to figure out a way to send the values from Arduino to p5. I added a Serial.write(); line to each button value. The input in serial.Write corresponded to the Cases in the p5 code. For example, if the play button were to be a certain state, it would send out a serial.Write (49), which the p5 code would listen in the serial.read, which would then fire off the correct interaction on the p5 end.
At first the codes were not connected. The p5 code was programmed to listening only for key presses on the actual keyboard. After playing with the “input” in the controlSound function for a while, and trying to figure out where I needed to put “inData” (the variable for the serial.read) to effect the songs in the sketch, I realized what I needed to do. The issue was with the calling of the this controlSound button in the keyReleased function. I had to get rid of the keyRelease function and call the controlSound() function in the Serial event.

Another area I needed to figure out was what exactly was being sent over from Arduino to p5 on Serial.write. This Lab reports that the Serial.write sends over an ASCII of the input that it receives. However, the number that I put into Serial.write was the same number that was printing out in the canvas of the sketch in p5. This lead me to believe that this function: inData = Number(serial.read()); translates the data sent from arduino into the same number instead of outputting it as ASCII.
Step 7: Connecting More Buttons
Initially I had the code and serial control working perfectly with one button
This is a modal window.
However, when set up with multiple buttons, the serial read on the p5 end was getting wild values. It was unstable. This is where, with the help of Tom Igoe, we learned that it is best to run the p5 code through the incognito window.
Troubleshooting
Eventually I had all of the buttons in the circuit and working with the serial communication.

However, there came a point where the small push buttons on the board stopped working and responding with no change to the code or circuit. I tried moving one button and its wires around on the breadboard and it worked in its new location. So I forged ahead with soldering as it appeared as though it was a bread board issue.
When soldered, the small buttons, all but one worked. I switched out the button and it still was not working, even though the multimeter readings showed that it was connected and working properly. So I switched out the button and it still did not work, yet had good readings on the multimeter. Then I switched out each wire individually, and also switched the place on the proto-board that this button was connected and then it worked just fine. Who knows exactly what the reason was, however I am leading myself to believe that it was a faulty wire.
Side Lesson Learned:
Solder likes to follow gravity.
The Code
The Arduino code (for now) is as follows. More updates will be made to the motor control vibrations.
| //References | |
| //Basic Example, Arduino IDE | |
| //https://cdn-shop.adafruit.com/datasheets/DRV2605.pdf | |
| //Tom Igoe switch state example | |
| #include <Adafruit_DRV2605.h> | |
| #include <Wire.h> | |
| const int onOff = 5; | |
| const int pausePlay = 6; | |
| const int skipForward = 9; | |
| const int skipBack = 10; | |
| const int fastForward = 11; | |
| const int randomSong = 12; | |
| const int one = 49; | |
| const int two = 50; | |
| const int three = 51; | |
| const int four = 52; | |
| const int five = 53; | |
| const int six = 54; | |
| int lastOnOff = HIGH; //start/stop button | |
| int lastPausePlay = HIGH; //pause/play button | |
| int lastSkipForward = HIGH; //skip forward | |
| int lastSkipBack = HIGH; //skip back | |
| int lastFastForward = HIGH; //fast forward | |
| int lastRandom = HIGH; //random song | |
| Adafruit_DRV2605 drv; | |
| void setup() { | |
| Serial.begin(9600); | |
| pinMode(onOff, INPUT_PULLUP); | |
| pinMode (pausePlay, INPUT_PULLUP); | |
| pinMode(skipForward, INPUT_PULLUP); | |
| pinMode(fastForward, INPUT_PULLUP); | |
| pinMode(randomSong, INPUT_PULLUP); | |
| drv.begin(); | |
| drv.selectLibrary(1); | |
| //I2C trigger sends "go" | |
| //default internal trigger when sending GO | |
| drv.setMode(DRV2605_MODE_INTTRIG); | |
| } | |
| //1 = UP | |
| //0 = DOWN | |
| void loop() { | |
| int currentOnOffButton = digitalRead(onOff); | |
| int currentPausePlayButton = digitalRead(pausePlay); | |
| int currentSkipForwardButton = digitalRead(skipForward); | |
| int currentSkipBackButton = digitalRead(skipBack); | |
| int currentFastForwardButton = digitalRead(fastForward); | |
| int currentRandomButton = digitalRead(randomSong); | |
| //start/stop BUTTON | |
| if (currentOnOffButton != lastOnOff) { | |
| delay(10); | |
| if (currentOnOffButton == LOW) { | |
| drv.setWaveform(0, 47); //effect | |
| drv.setWaveform(1, 0); // end wave form | |
| //play the effect | |
| drv.go(); | |
| //wait a bit | |
| Serial.write(49); | |
| Serial.println(47); | |
| delay(500); | |
| } else { | |
| drv.setWaveform(0, 111); //effect PLAY | |
| drv.setWaveform(1, 0); // end wave form | |
| //play the effect | |
| drv.go(); | |
| //wait a bit | |
| Serial.write(49); | |
| Serial.println(111); | |
| delay(500); | |
| } | |
| } | |
| lastOnOff = currentOnOffButton; | |
| //Pause Play Button | |
| if (currentPausePlayButton != lastPausePlay) { | |
| delay(10); | |
| if (currentPausePlayButton == LOW) { | |
| drv.setWaveform (0, 98); //set wave form | |
| drv.setWaveform (1, 0); //end wave form | |
| drv.go(); | |
| //wait a bit | |
| Serial.write(50); | |
| Serial.println(98); | |
| delay(500); | |
| } else { | |
| drv.setWaveform(0, 47); //effect PLAY | |
| drv.setWaveform(1, 0); //end wave form | |
| drv.go(); | |
| Serial.write(50); | |
| Serial.println(47); | |
| delay(500); | |
| } | |
| } | |
| lastPausePlay = currentPausePlayButton; | |
| //Skip Forward Button | |
| if (currentSkipForwardButton != lastSkipForward) { | |
| delay(10); | |
| if (currentSkipForwardButton == LOW) { | |
| drv.setWaveform(0, 86); | |
| drv.setWaveform(1, 0); | |
| drv.go(); | |
| Serial.write(51); | |
| delay(500); | |
| } | |
| } | |
| lastSkipForward = currentSkipForwardButton; | |
| //Skip Back Button | |
| if (currentSkipBackButton != lastSkipBack) { | |
| delay(10); | |
| if (currentSkipBackButton == LOW) { | |
| drv.setWaveform(0, 74); | |
| drv.setWaveform (1, 0); | |
| drv.go(); | |
| Serial.write(52); | |
| delay(500); | |
| } | |
| } | |
| lastSkipBack = currentSkipBackButton; | |
| //FAST FORWARD | |
| if (currentFastForwardButton != lastFastForward) { | |
| delay(10); | |
| if (currentFastForwardButton == LOW) { | |
| drv.setWaveform(0, 76); | |
| drv.setWaveform(1, 0); | |
| drv.go(); | |
| Serial.write(53); | |
| delay(500); | |
| } | |
| } | |
| lastFastForward = currentFastForwardButton; | |
| //Random | |
| if (currentRandomButton != lastRandom) { | |
| delay(10); | |
| if (currentRandomButton == LOW) { | |
| drv.setWaveform(0, 54); | |
| drv.setWaveform(1, 0); | |
| drv.go(); | |
| Serial.write(54); | |
| delay(500); | |
| } | |
| } | |
| lastRandom = currentRandomButton; | |
| // | |
| // Serial.print("Random "); | |
| // Serial.println (currentRandomButton); | |
| // Serial.print("FF "); | |
| // Serial.println (currentFastForwardButton); | |
| // Serial.print("Digital Read "); | |
| // Serial.println (currentOnOffButton); | |
| } |
 by
by Using the original sound controller code from Tom Igoe, I was able to add my own aesthetics, add the serial communication code, and change the functions around a bit in order to get it to work with my Arduino Code:
| /* | |
| Music player | |
| Plays a directory of music | |
| Plays songs in a subdirectory of the sketch called music | |
| Put any songs you want in the music subdirectory, then | |
| copy the list of song names into the songs[] array. | |
| created by Tom Igoe | |
| 5 Feb 2017 | |
| http://www.asciitable.com/ | |
| */ | |
| var song; // the sound file to be played | |
| var serial; | |
| var portName = '/dev/cu.usbmodem1421'; | |
| var inData; | |
| // the list of songs: | |
| var songs = ['songA.mp3','songB.mp3', 'songC.mp3', 'songD.mp3', 'songE.mp3']; | |
| var songCount = songs.length; // number of songs in the music dir | |
| var currentSong = 0; // current song number | |
| function preload() { // load the first song on preload | |
| song = loadSound('music/' + songs[currentSong]); | |
| } | |
| function setup() { | |
| createCanvas(1000, 800); | |
| serial = new p5.SerialPort(); | |
| //serial.on('list', printList); | |
| serial.on('connected', serverConnected); | |
| serial.on('open', portOpen); | |
| serial.on('data', serialEvent); | |
| serial.on('error', serialError); | |
| serial.on('close', portClose); | |
| serial.list(); | |
| serial.open(portName); | |
| } | |
| function serverConnected() { | |
| println('connected to server'); | |
| } | |
| function portOpen() { | |
| println('the serial port opened'); | |
| } | |
| function serialEvent() { | |
| inData = Number(serial.read()); //converts to regular number not ASCIII??? | |
| console.log(inData); | |
| controlSound(inData); | |
| } | |
| function serialError(err) { | |
| println('something went wrong with the serial port. ' + err); | |
| } | |
| function portClose(){ | |
| println('the serial port closed') | |
| } | |
| function draw() { | |
| background(255, 10, 80); | |
| fill(255, 255, 20); | |
| // draw the song's name and current time in seconds: | |
| textSize(60); | |
| text(songs[currentSong], 20, 100); | |
| text(song.currentTime().toFixed(3), 20, 200); | |
| textSize(20); | |
| text('sensor value: ' + inData, 750, 750) | |
| //fill (inData+100, inData-40, inData*2); | |
| noStroke(); | |
| fill(0); | |
| ellipse(10 +(2*inData), 350, 20, 20); | |
| rect(14+(2*inData), 315, 5, 40 ); | |
| rect(14+(2*inData), 315, 20, 5); | |
| rect(14+(2*inData), 325, 20, 5); | |
| } | |
| function controlSound(input) { | |
| switch(input) { | |
| case 49: // start/stop, press 1 | |
| song.rate(1.0); | |
| if (song.isPlaying()){ | |
| song.stop(); | |
| } else { | |
| song.play(); | |
| } | |
| break; | |
| case 50: // play/pause, press 2 | |
| song.rate(1.0); | |
| if (song.isPlaying()){ | |
| song.pause(); | |
| } else { | |
| song.play(); | |
| } | |
| break; | |
| case 51: // skip ahead, press 3 | |
| // make sure the song number is valid, and increment: | |
| if (currentSong < songs.length-1) { | |
| currentSong++; | |
| } else { | |
| currentSong = 0; | |
| } | |
| // get new song: | |
| getSong(currentSong); | |
| break; | |
| case 52: // skip back, press 4 | |
| // in the first second, just rewind the current track: | |
| if (song.currentTime() > 1.0) { | |
| song.jump(0); | |
| // if more than a second has elapsed, then | |
| // make sure the song number is valid, and decrement: | |
| } else { | |
| if (currentSong > 0) { | |
| currentSong--; | |
| } else { | |
| currentSong = songs.length-1; | |
| } | |
| // get new song: | |
| getSong(currentSong); | |
| } | |
| break; | |
| case 53: // fast forward, press 5 | |
| song.rate(2.0); // double the play speed | |
| if (!song.isPlaying()){ | |
| song.play(); | |
| } | |
| break; | |
| case 54: // random song, press 6 | |
| currentSong = Math.round(random(songCount)); // get a new song number | |
| getSong(currentSong); // play it | |
| break; | |
| } | |
| } | |
| function getSong(songNumber) { | |
| if (songNumber < songs.length) { // if the song number is in range | |
| if (song.isPlaying()) { | |
| song.stop(); | |
| } | |
| // load a new song: | |
| song = loadSound('music/'+ songs[currentSong], resumePlay); | |
| return true; | |
| } else { // if the song number was out of range, return false | |
| return false; | |
| } | |
| } | |
| function resumePlay() { | |
| // if the song isn't playing, play it | |
| if (song.isPlaying()){ | |
| song.stop(); | |
| } else { | |
| song.play(); | |
| } | |
| } | |
| // function keyReleased() { | |
| // controlSound(keyCode); // send the ASCII number of the key | |
| // } |
Schematics


Fabrication
Based on my original design sketches, I aimed to create a tiny box to house the circuitry.


Each time until now that I have made a box, the tabs were cut out of each other for such a perfect fit, that after the loss of material due to laser cutting, they would fit loosely. This time I aimed to make the tabs overlap a bit in the Illustrator design in hopes for a tighter fit. Yet lo and behold, I managed to do just the opposite. The tabs fit looser than normal. So I did what any normal, professional fabricator would do, I reached for the hot glue gun and never looked back.

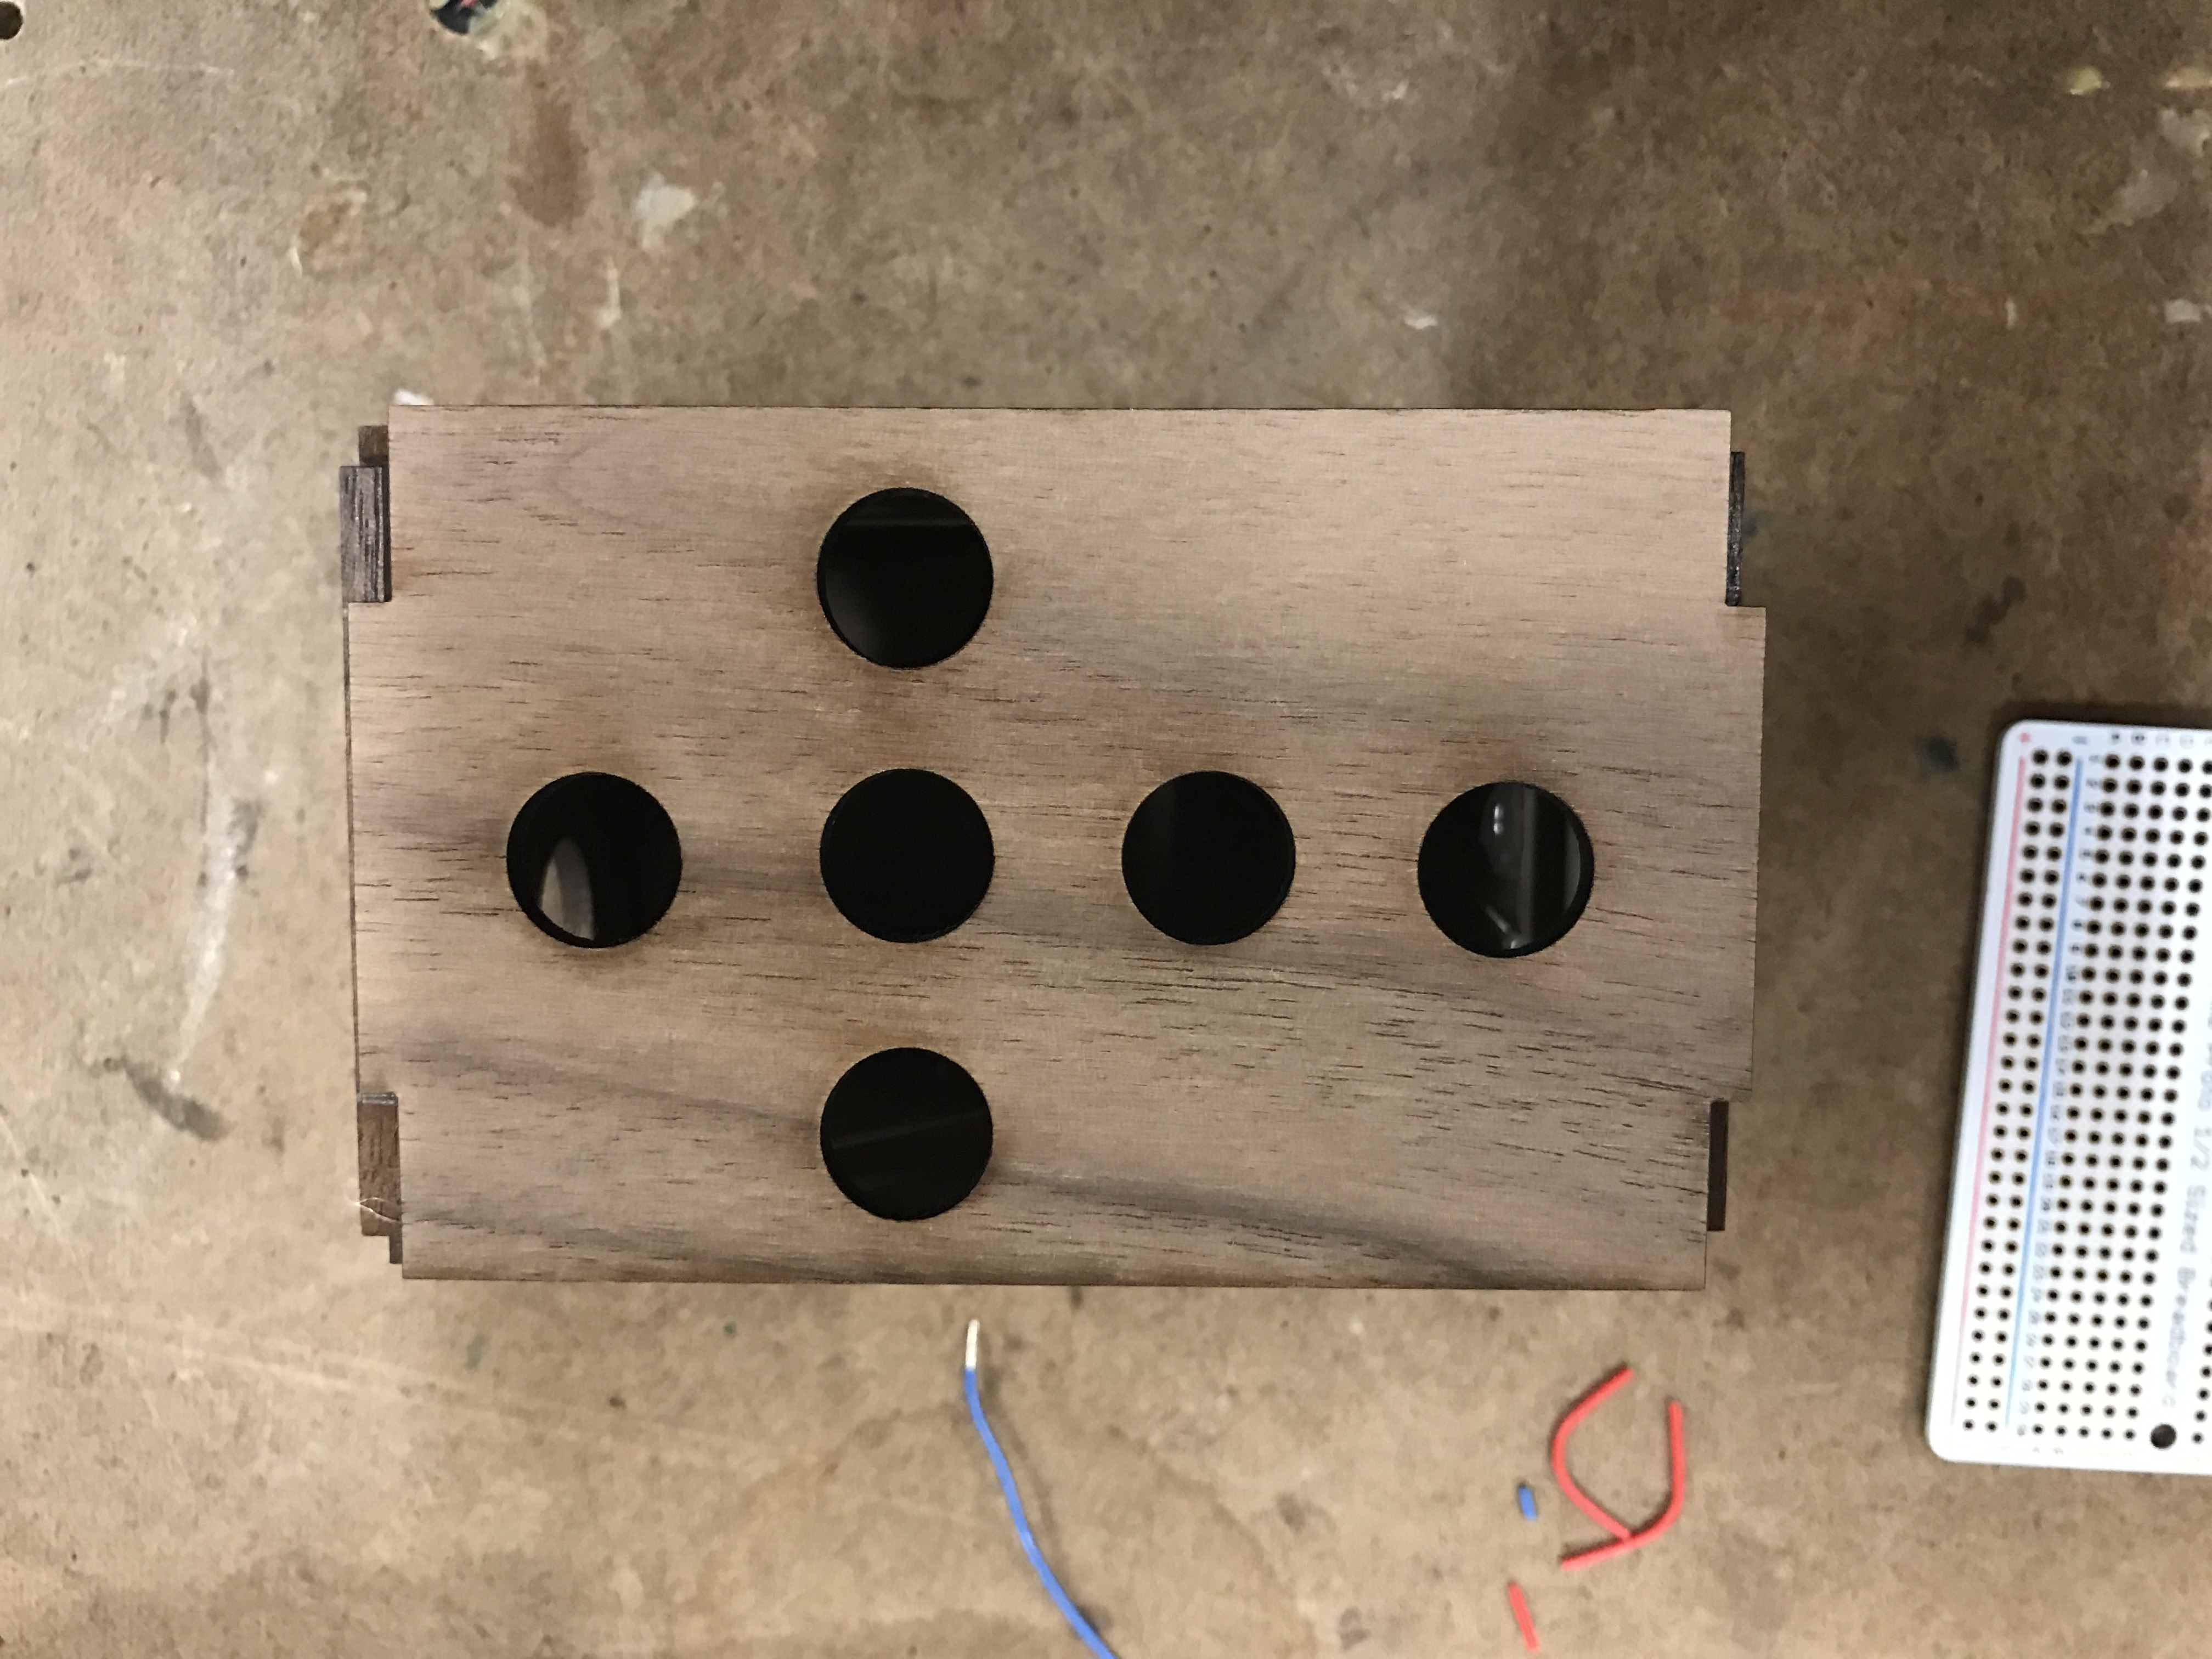
No, this is not a Celebration of Jesus at the advent of this Lenten Season, this is a design plan for a hand-held controller, but I would be lying if I said I did not shout “Jesus Christ” on multiple occasions while building this project.
Putting it All Together


This is a modal window.

Leave a Reply