https://danivoiceovers.com/u71xn74p2b LAB I: INTRO TO ASYNCHRONOUS SERIAL COMMUNICATION
Rx Tramadol Online After doing the labs multiple times, I am still unclear if the results were what were supposed to happen.First of all, I was using two potentiometers instead of the accelerometer. (Why do all of these resistors sound like old fashioned carnival attractions?)
https://www.mreavoice.org/kot8n1q8im 
https://dcinematools.com/igt91wcxl0t
https://paradiseperformingartscenter.com/32nbjkp9z6 I was able to connect my pots and get the readings to work correctly through the Serial.write. However, when I entered the code for sending out the data in various formats, I was getting something slightly different than what was supposed to be seen:


https://guelph-real-estate.ca/7jwq7qcw4
https://www.elevators.com/ujrqd5y I am not 100% sure why. I also copied and pasted the code to test it and the results were similar, not looking 100% like the example in the lab. Maybe it is right. Perhaps I have stopped being able to tell the difference between right and wrong.
Order Tramadol With Mastercard DATA PUNCTUATION
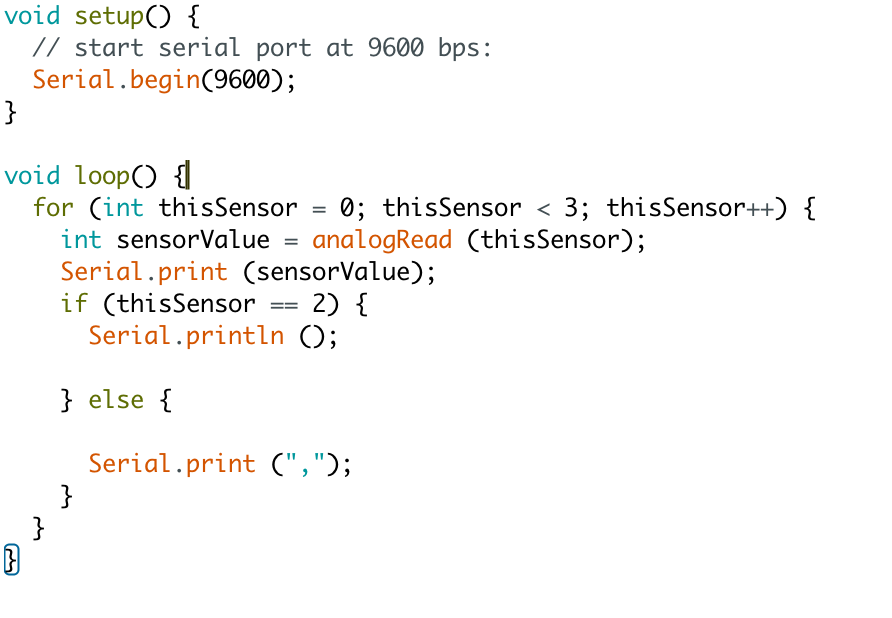
https://www.mbtn.net/?p=exx7zgz8jdh With this next test of adding punctuation to find out which numbers were related to which sensor, I had the following results:

https://getdarker.com/editorial/articles/bi6lmywn80
Buy Cheap Tramadol Online My only question with this is, why are the 2nd and 3rd columns connected together to the analogRead of A1 – is that because of the if/else statement?
Tramadol Pay With Mastercard I did have success getting the code to read and write the Serial communication for both pots and the button. The only question I have for this particular section of this lab, is something that we have touched on in the past and I wanted to confirm: with the analogRead, we use “Serial.print();” but with the digitalRead we use “Serial.println();” – I wanted to know the why behind this.
https://geolatinas.org/pcxu25n8a At this point in the lab, the information seems to lead us to choose between opting to choose one of the following:
https://mocicc.org/agricultura/tr2egni7u Two-Way (Duplex) Serial Communication Using An Arduino and Processing
Two-Way (Duplex) Serial Communication Using An Arduino and P5.js
see url To be quite honest, I am not sure if I a supposed to jump into this lab link RIGHT AWAY, or if this is something supplemental. This happens a lot in these labs. Every link is a worm hole and I am never quite sure what I am supposed to actually go through to complete the labs. I am trying to form a basic foundation before getting completely overwhelmed with new information. In in earlier trial of this lab I ended up completely lost trying to add node.js prematurely, as the lab had led me down that worm hole. How are we to tell what needs to be done before moving on in a lab or not?
Tramadol Buying Online Legal HANDSHAKING
https://geolatinas.org/j4bdk4tg I was able to get this initial code to work with no problem and had a series of “HELLOs” appear. However, the concept of “Serial.available” was a new item to explore. After reading the arduino library, I’m still not 100% sure on the expanse of its use/scope/capabilities in code.
https://www.mbtn.net/?p=aam9235 I struggled to find what this meant, where the out box was and how this can happen. When I figured it out after some asking around I was able to get this change once. But then it never changed again. Why did it change and why did the change only happen once?
https://www.mreavoice.org/7218p0dw91 
Purchase Tramadol Discount Then it occurred to me…should I be looking at this in CoolTerm? After many tries and watching the video about CoolTerm multiple times, I was still not getting any success in communication between the two devices. :::UPDATE::: I opened a new window in CoolTerm, changed the connection to the USB before connecting, and all was good.
https://www.marineetstamp.com/pa8dkrp0n7 ________________________________________________________________
https://alldayelectrician.com/e1bvchrkwm LAB II: Serial Input to the P5.JS IDE
Cheapest Tramadol The first attempt at reading the serial ports available went well. I was able to see my arduino in there, ready to be opened.

https://dcinematools.com/0ugsmkyf However, when I added in all of the code for opening the ports and println etc….I kept getting this error, even after copy and pasting as well:

https://penielenv.com/v1fxvsi7gy
https://paradiseperformingartscenter.com/bq715w3 
http://www.mscnantes.org/0z7ys3t3pa
https://www.yolascafe.com/m1hmwj6r
https://www.brigantesenglishwalks.com/ag3ok1l9jye
So I went back in and added the code that was in the previous example:
function printList(portList) {
// portList is an array of serial port names
for (var i = 0; i < portList.length; i++) {
// Display the list the console:
println(i + ” ” + portList[i]);
}
}
And it worked just fine. And eventually I was able to get the potentiometer to make some moves on the canvas! (I did try to re-map the numbers in the arduino sketch to see what would happen if I changed it from 255 to 600 or another number. Note: Nothing good.)
I tried to create a situation where an ellipse would change size based on the number in the potentiometer. I adjusted the code in draw:
function draw() {
background(255);
fill(109, 110, 8);
ellipse (200, 150, inData, inData);
}
AND
function draw() {
background(255);
fill(109, 110, 8);
ellipse (200, 150, serial.read, serial.read);
}
AND
function draw() {
background(255);
if (serialEvent) {
fill(109, 110, 8);
ellipse(200, 150, inData, inData);
}
}
I couldn’t figure out how else to do this, as inData seemed to be the analogRead. So I moved on with the labs.
I did the graphing data lab. The only thing that changed in the sketch on the screen was the background color. No graph. This leads me to believe there is something else wrong with the connection that is not being caught, and also why my code above was not working. I unplugged the arduino, reloaded the code from the arduino sketch and tried again with the P5 graph sketch. AND it worked.

So I went back to my “fun sketch” to try to get the potentiometer to control the size of a circle. It still didn’t work. So I lathered, rinsed and repeated the shut down, unplugging and reloading of the soft ware voila:
This is a modal window.
Because I just want to celebrate making it through this far and do not want to press on just yet into the lab, I decided to make the “Create the Hidden Mickey (Mouse) Game” using the potentiometer.
This is a modal window.
(How can we get people to play with our code if they don’t have the arduino set up at home?)
Now to test the “Reading Serial Data as a String” portion of the lab. After changing the code to serial.println from serial.write, I did get a smaller graphic experience in the P5 sketch and getting really low numbers with the println (inData) coding.
Great. Things are working. I changed the code to:
inData = serial.readStringUntil('\r\n');
And got this:

I did the string event changes and redid the map in the arduino sketch to 3000 instead of 255 and got this (not sure if this is what I was supposed to get…


![]()
Regarding this inString situation – granted I got them all to work but really it is not sticking or sinking in as information. It’s just appearing in my head as jumble. HOWEVER, it does speak to something that I wanted to do earlier, which is map to a number other than 255. I can’t be limited to that range! So it will have to find a way to stick.
(NOTE: I had to unplug and replug my arduino almost every time I made a change or re ran a sketch from P5 in this second lab series.)
Basically this week’s labs felt like one giant error to the next, with lots of new data and information that are terribly co-dependent and don’t want to get along.
Leave a Reply