I spent my time this week trying to work through the complications of java script, modifying the “game” that I put together last week. I did experience some breakthroughs and hopefully I will remember this all as the coding becomes more intricate.
Last week I attempted to make a taxi move along the bottom of KING KONG’s New York City of 1933. If you rolled the mouse over a certain area, a big heart appeared on Kong’s chest, because everyone knows he is just a big softy looking for love.
GOAL: Be able to take the complicated mess of code for the taxi and be able to move it all at once with mouseX & mouseY.
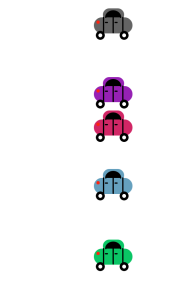
First I was able to extract the taxi code from the the original file and separate it on its own, as a taxi moving back and forth along the bottom of the screen. I created the TAXI function and called it in the code multiple times:
function taxi (y, r, g, b)
y = the y coordinate
r, g, & b = colors
The taxi can now be packaged and change based on its colors and y coordinate. So I made a lot of taxis move back and forth across the screen.
When reading through the Maker: P5.JS book and watching the videos I was getting lost in math equations. Actually going through on my own creating this function and figuring out how to make the y move helped me realize that it is all trial and error and based on your own variable and vocab. It makes more sense when it’s your own calculating. (At least that is what I realized at this point.)
As to not have two “x” variables, I added “hz” (horizon) to use in place of “x” in the function, but kept “y.” I had to do some math-ing to calculate the changes in “y,” should the taxi function need to be called multiple times along the Y axis.
The result:
Great! But I still could not figure out how to isolate a taxi and move it with mouseX, mouseY.
Next: I added the keyIsPressed function to be able to move the taxi up and down the Y axis with the up and down arrows. Following along with the animation tutorial, I applied easing and used targetX, targetY, so now the taxi looks like it is smooth sailing.
I then had an epiphany while back in the Maker book. I wanted to translate () the taxi function to mouseX and mouseY to see if this gives the mouse control of the taxi’s movement.
And it worked!
This is a modal window.
Here are some lingering questions from this week:
- How can I control the “x” variable which is essentially “hz” in this codewith keyIsPressed when the code is completely complex.
- How can I control multiple taxis? (Is this even necessary)
var hz = 0; //horizon
var speed = 1;
var xpos = 200;
var ypos = 100;
var numPixels = 40;
var targetX;
var targetY;
var easing = 0.05;
function setup() {
createCanvas (500,600);
}
function draw() {
background (255);
//taxi (CENTER);
translate (mouseX, mouseY);
taxi (ypos, 10, 90, 200);
var fluidY = targetY-ypos;
if (abs(fluidY)>0.3) {
ypos += fluidY*easing;
}
if (hz>width || hz<0) {
speed = speed * -1;
}
hz = hz + speed;
}
function keyPressed () {
if (keyCode == UP_ARROW){
targetY = ypos – numPixels;
}
if (keyCode == DOWN_ARROW) {
targetY = ypos + numPixels;
}
}
//if ((mouseX>20) && (mouseX<120)&&(mouseY < 567) && (mouseY > 550)){
// taxi (557, 0, 19, 180);
//}
//else {
//taxi (50, 100, 100, 100);
//taxi (157, 150, 33, 180);
//taxi (209, 209, 38, 101);
//taxi (410, 10, 197, 101);
//taxi (300, 101, 160, 190);
//if mouseIsPressed ()
//taxi (50, 100, 100,100) = random (height, 255, 255, 255);
function taxi (y, r, g, b) { //y coordinate, red, green, blue
//taxi body bottom
fill (r, g, b);
noStroke ();
rect (hz, y, 60, 25, 15);
//taxi body top
rect (hz+14, y-14, 33, 20, 10);
//taxi window and doors
fill (0);
stroke (0);
strokeWeight (2);
arc (hz+30, y, 23 , 20, PI , 0 );
line (hz+15, y, hz+15, y+24);
line (hz+30, y, hz+30, y+24);
line (hz+45, y, hz+45, y+24);
//handles
line (hz+18, y+8, hz+21, y+8);
line (hz+33, y+8, hz+36, y+8);
//lights
noStroke ();
fill (255, 35, 15)
rect (hz+4, y+5, 5, 5, 2);
//taxi wheels
stroke (0);
strokeWeight (4);
noFill ();
ellipse (hz+10, y+28, 10, 10) //taxi wheel back
ellipse (hz+47, y+28, 10, 10 )//taxi wheel front
}


Leave a Reply